![How to Set Up WooCommerce Google Pay and Accept Online Payments in Your Store [2024]](https://sublium.com/wp-content/uploads/2024/12/woocommerce-google-pay-funnelkit-pay.png)


Looking to boost sales by offering WooCommerce Google Pay on your eCommerce store?
Digital payments like Google Pay and Apple Pay are the fastest-growing payment methods worldwide.
| Plugin | Best For | Free Plan | Starting Price |
|---|---|---|---|
| FunnelKit Automations | All-in-one newsletter solution | Yes | $99.50/year |
| WPForms | Newsletter subscription forms | Yes | $49.50/year |
| Jetpack CRM | Turn blog posts into Newsletters | Yes | $64.80/year |
| Newsletter | Newsletter creation & list Management | Yes | $49.50/year |
| Email Subscribers & Newsletters | Newsletter and post update notification | Yes | $129.00/year |
| Simple Newsletter Plugin | Collect emails & one-time newsletter | Yes | $89.40/year |
| HubSpot | Newsletter & automations | Yes | $89.40/year |
| Brevo | Multichannel newsletter campaign | Yes | $9/month |
| Mailpoet | Newsletter & post notifications | Yes | $10/month |
| Mailster | Self-hosted newsletter campaign | N/A | $199 |
| Event Calendar Newsletter | Event-driven newsletter | Yes | $99/year |
| Best For | An all-in-one newsletter solution for WooCommerce that supports customer segmentation, visual builder, automation, detailed analytics, and more, all from the WordPress dashboard. |
| Price | Free. The premium starts at $99.50/year |
| Active Installations | 20,000+ |
| Rating | 4.9 (285 five-star reviews out of 291 total ratings) |
Without options like Google Pay, you risk losing customers who prefer quick, hassle-free transactions. Every abandoned cart could be a missed opportunity to grow your revenue.
Yes, many WordPress newsletter plugins let you send newsletters without using a separate email platform. You can use FunnelKit Automations to design, send, and track newsletter performance from the WordPress dashboard.
Yes, many WordPress newsletter plugins support automation. For advanced behavior-based automation, FunnelKit Automations is a top choice, allowing you to send targeted emails triggered by customer actions such as sign-up, order creation, and cart abandonment.
Yes, many plugins allow you to send newsletters, but for advanced features like segmentation and tracking, you will need the premium versions.
Good newsletter plugins are optimized to avoid slowing down your WordPress site. You can use any of the plugins from my recommendation, and you won’t have to worry about the site’s speed.
By integrating Google Pay, you make it effortless for customers to shop.
By integrating Google Pay, you make it effortless for customers to shop.
🏆 Winner: FunnelKit
Why? Because value isn’t about being the cheapest. It’s about getting the most impact for every dollar. FunnelKit bundles advanced features like analytics, automations, and CRM that other tools charge extra for.
- Beginners get enterprise-grade tools without high upfront costs.
- Growing stores scale with upsells, order bumps, and analytics at an affordable price
- Agencies replace entire marketing stacks with FunnelKit’s all-in-one suite.
FunnelKit isn’t just a plugin, it’s a growth investment that pays for itself in higher conversions, repeat sales, and lower software costs.
A single click fetches their saved card and address details from their Google account—no typing, no waiting. It’s fast, secure, and designed for a smooth checkout experience.
Let’s dive into how you can add both the Google Pay express and inline payment options to your WooCommerce store.
What is WooCommerce Google Pay?
WooCommerce Google Pay is a payment method that integrates Google Pay with your WooCommerce store.
With Google Pay, customers don’t need to manually enter their credit cards or shipping information at checkout.
Instead, they can authorize payments with a single click or tap, making the checkout process faster and more convenient.
How Does Google Pay Work in a WooCommerce Store?
The Google Pay button opens a convenient payment window, displaying the payment methods saved in users’ Google accounts.
- The Google Pay button opens a convenient
- It also includes optional fields, such as billing addresses
- Such as billing addresses, it also includes optional fields
- The Google Pay button opens a convenient
- It also includes optional fields, such as billing addresses
- Such as billing addresses, it also includes optional fields
It also includes optional fields, such as billing addresses, allowing users to quickly add or update payment methods, shipping addresses, or other details.
Here’s how it works, step by step:
1. User saves payment details
Users save their credit or debit card details and shipping addresses to their Google account.
Google Pay securely stores this information using encryption and tokenization to protect their sensitive data.
2. Payment processing
When a customer taps the Google Pay button on your WooCommerce store, Google Pay retrieves their saved card and address details.
This eliminates the need for users to manually enter their information, making the checkout process faster and easier.
3. Authentication
The customer authorizes the payment using their preferred method, such as:
- Fingerprint or face recognition on a mobile device
- A PIN or password for added security
4. Tokenized transaction
Google Pay sends a unique, encrypted token (not the actual card details) to the merchant’s payment gateway.
This ensures the customer’s card information remains private and secure throughout the transaction.
5. Payment confirmation
The payment is processed and the merchant receives the funds.
The customer is redirected to the order confirmation page, completing the transaction seamlessly.
Benefits of Using Google Pay in Your WooCommerce Store
Integrating Google Pay into your WooCommerce store offers a host of benefits for both you and your customers.
According to the WorldPay Global Payments Report, digital wallets like Google Pay accounted for 49% of global eCommerce transaction value and have surpassed traditional payment methods like credit cards.
Over 150 million active users have widely used Google Pay across 42+ countries.
Here are some key benefits of using Google Pay in your WooCommerce store:
1. Faster checkout process
With Google Pay, customers can complete purchases in seconds.
Since their payment and address information is already saved in their Google account, they don’t need to enter their card details or shipping address manually.
A simple tap or click is all it takes to complete the transaction, minimizing cart abandonment and increasing conversions.
2. Improved mobile shopping experience
Google Pay is especially beneficial for mobile shoppers.
With an increasing number of shoppers on smartphones, offering a streamlined payment option like Google Pay can significantly enhance the mobile checkout experience.
Google Pay’s one-click payment option on mobile ensures customers can quickly complete their purchases without friction.
3. Enhanced security
Google Pay uses tokenization and encryption to keep customers’ data safe.
When a customer makes a payment, Google Pay uses a unique, encrypted token to secure sensitive information.
Additionally, customers can authenticate their payments using fingerprint or facial recognition, adding an extra layer of security.
4. Increased trust and convenience
Consumers are more likely to trust stores that offer well-known payment options like Google Pay.
By integrating this widely recognized mobile payment solution, you offer a fast and secure payment method that meets customer expectations.
This trust can lead to higher conversion rates, repeat purchases, and positive reviews.
5. Lower cart abandonment rates
A slow or complicated checkout process is one of the primary causes of cart abandonment.
By adding Google Pay to your WooCommerce store, you can significantly reduce friction during checkout, making it effortless for customers to complete their purchases.
The ease of use and speed of Google Pay help ensure more transactions are completed, leading to higher sales.
6. No additional fees
Unlike other payment gateways that may charge extra transaction fees, Google Pay does not impose additional charges on merchants.
You’ll pay the standard processing fees through your payment gateway, but no hidden costs are associated with using Google Pay.
This makes it a cost-effective payment solution for many WooCommerce store owners.
Essentials for Setting Up WooCommerce Google Pay
Before integrating Google Pay with your WooCommerce store, ensure you have the following:
1. A Stripe account
To start accepting payments, you’ll need a Stripe account.
Setting up Stripe is free, but they charge transaction fees that vary by country.
2. FunnelKit Pay
WooCommerce doesn’t integrate with Stripe by default. You need a payment gateway plugin like FunnelKit Pay to establish the WooCommerce – Stripe integration.
FunnelKit Pay is a robust solution for simplifying your store’s payment process on both web and mobile.
FunnelKit Pay makes setting up Stripe in WooCommerce quick without manually entering API keys or creating webhooks. It takes less than two minutes to complete the setup and onboarding process.
Here’s what it offers:
- Card payments – Accepts all major credit and debit cards like Visa, Mastercard, Discover, JCB, Diners Club, American Express, and more.
- Express checkout – Enable faster transactions with Google Pay and Apple Pay express checkout payments.
- Local payment methods – Supports region-specific payments with SEPA, iDEAL, P24, and Bancontact.
- Buy Now Pay Later (BNPL) – Add flexible BNPL payment options like Affirm, Klarna, and Afterpay to your store.
- Deep integration – Seamlessly integrates with checkout pages, one-click upsells, and more.
With FunnelKit Pay, your WooCommerce store will offer a secure and efficient payment experience tailored to your customer’s preferences.
WooCommerce Google Pay Setup and Button Visibility: Two Integration Methods
You can use two methods to integrate Google Pay with your WooCommerce store:
Method 1: Using the Stripe Payment Request Button
The Stripe Payment Request Button is a common way to integrate Google Pay with WooCommerce.
This method enables Stripe-powered payments directly through your store. However, it comes with certain limitations and dependencies.
- Country availability: Ensure your customers are in a region where Google Pay is supported – check the list of supported countries here.
- Device compatibility: The device must be Google Pay-compatible. iPhones and iPads can only use Google Pay in the US and India. Check the list of compatible devices here.
- Browser dependency: Customers must use the Chrome browser when logged in to their Google accounts with saved card details.
While functional, this method often causes issues for store owners, particularly with the visibility of the Google Pay button.
It’s also highly dependent on customer-specific conditions, making it less reliable for stores targeting a diverse audience.
2. Enhanced Google Pay Integration
FunnelKit Pay offers an advanced Google Pay integration that overcomes the limitations of the Stripe Payment Request Button.
- Browser independence: The GPay express button is visible on all browsers, not just Google Chrome.
- Global accessibility: This method eliminates the country and device restrictions, making it more accessible to a wider audience.
- Improved user experience: The integration ensures the GPay button appears consistently across your store, offering a smooth checkout process.
- Stripe-powered payments: Payments are still processed through Stripe, ensuring security and reliability.
With FunnelKit Pay, you can create a consistent and hassle-free Google Pay checkout experience for your WooCommerce store.
How to Integrate Stripe Google Pay Payment Gateway with WooCommerce?
Now that you know the WooCommerce Google Pay integration requirements, let’s connect Stripe with WooCommerce and set up Google Pay.
Step 1: Install and activate FunnelKit Pay
Navigate to Plugins ⇨ Add New and search for the “FunnelKit Pay” plugin in your WordPress dashboard.
Once you locate the plugin, install and activate it.
Let’s connect your Stripe account with WooCommerce.
Step 2: Connect and configure your Stripe account
In the plugins dashboard, you’ll see a banner that prompts you to integrate Stripe into your WooCommerce store.
Click on the ‘Start Onboarding Wizard’ button.
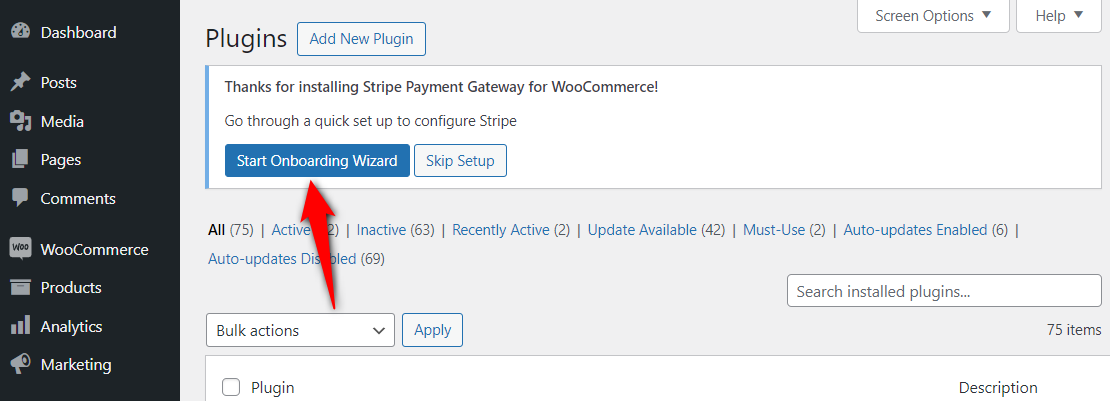
FunnelKit Pay lets you set up Stripe WooCommerce integration within a few minutes without any manual work.
It automatically sets up the webhook to trigger payment-related events.
You just need to log in to Stripe and follow the process in the onboarding wizard.
Step 3: Enable Google Pay express checkout
Navigate to Stripe settings under WooCommerce payment settings.
From there, click on the Express Checkout section and enable it from there.
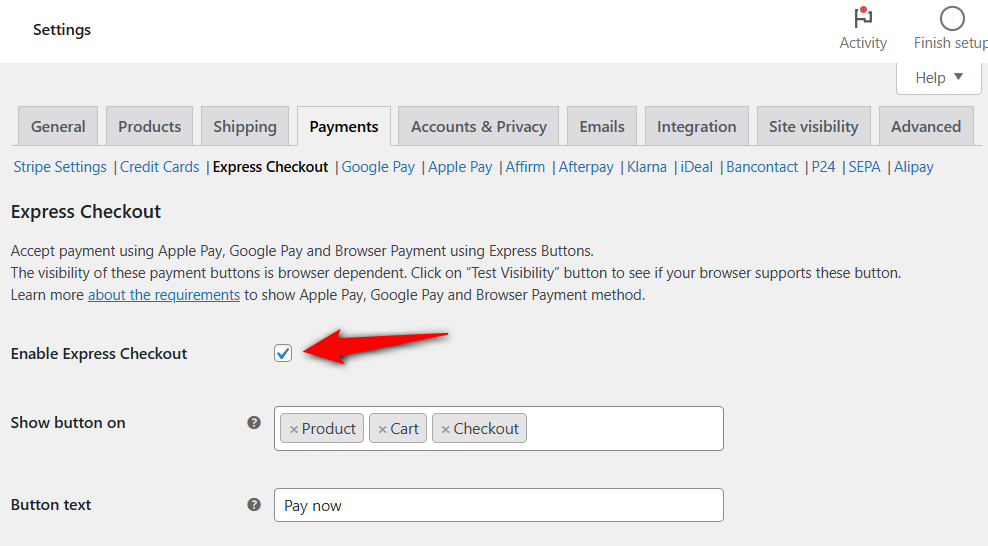
Step 4: Configure the Google Pay express checkout button
Configure the Google Pay express checkout button from these settings:
- Show button on – Set pages like product, cart, or checkout page where you want to show the Google Pay express payment button.
- Button text – Enter the text you want to display on the Google Pay express button.
- Button theme – Choose the theme of your Google Pay button.

Test the visibility of your Apple Pay and Google Pay express checkout button from here.
Scroll down and configure the advanced customization options for different pages.
Product page options
Set the button position and separator text between the add to cart and GPay buttons.

Cart page options
Enter the separator text.

Checkout page options
Configure the following Google Pay button options on the checkout page:
- Button position – Set the GPay button position to either above billing details or above the checkout form.
- Title – Enter the title of your GPay express checkout button.
- Button width – Select the width of your express checkout button.
- Alignment – Choose the button alignment: left, center, or right.
- Separator text – Enter the separator text.
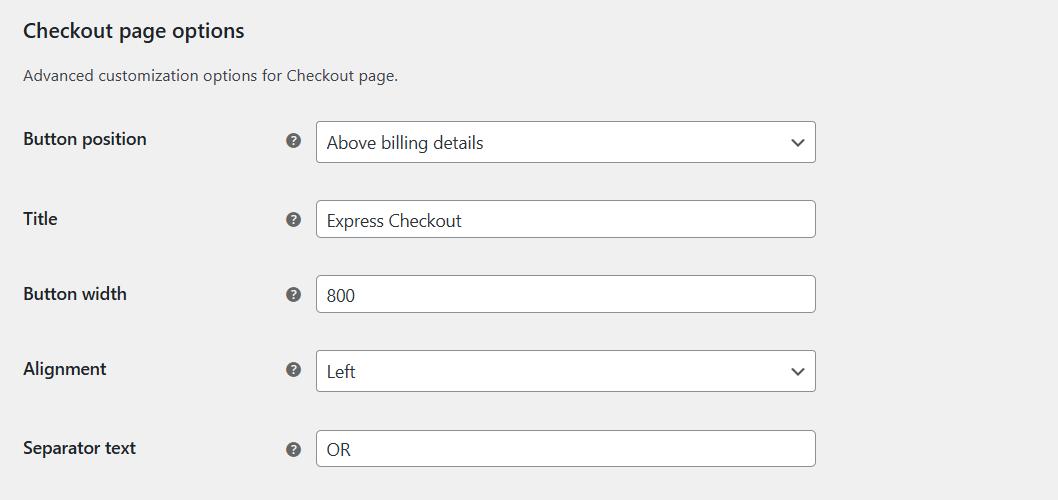
Click on ‘Save changes’ when done.
This is how you can enable Google Pay in your WooCommerce store.
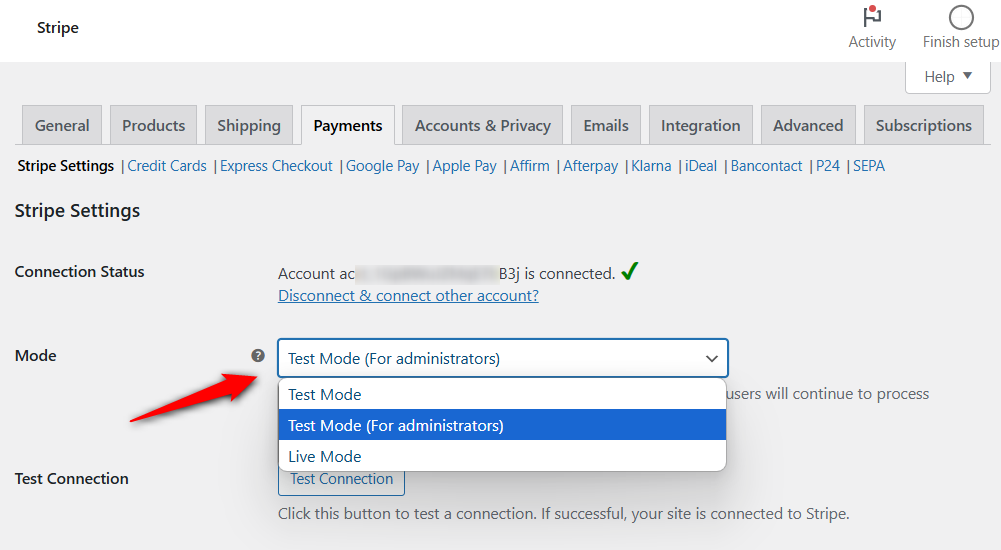
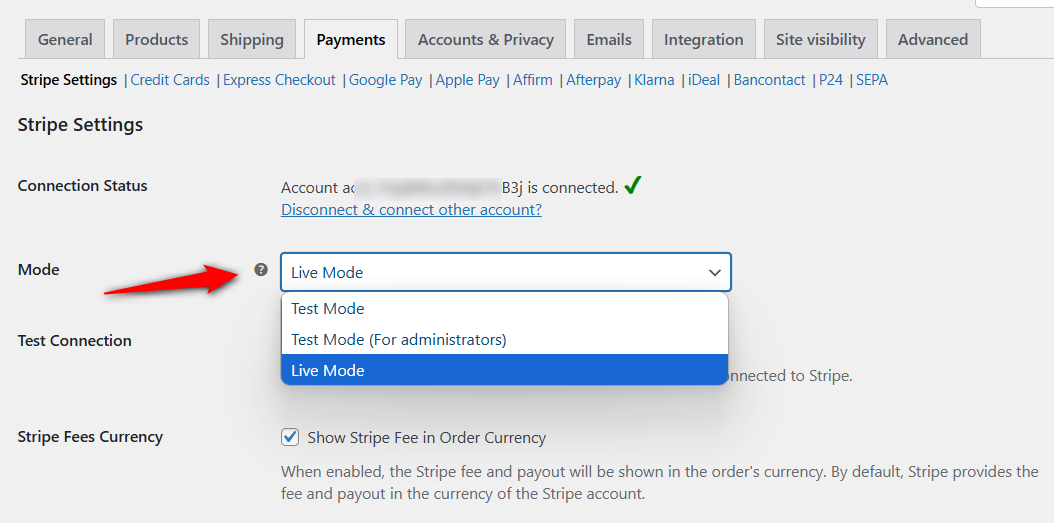
How to Test Google Pay Transactions in Your WooCommerce Store?
Make sure to enable the test mode.
FunnelKit Pay has the “Admin Only Test” mode that lets store admins to test transactions in their stores while keeping customers in the live mode.
Google Pay express checkout button on the WooCommerce product page
Go to the shop page of your WooCommerce store and click on any product.
You’ll see the Google Pay button on the product page.

You can purchase this product simply by clicking on the GPay button with one click.
GPay express transaction button on the WooCommerce cart page
Add this item to your cart and go to the default cart page to see the Google Pay express payment there.
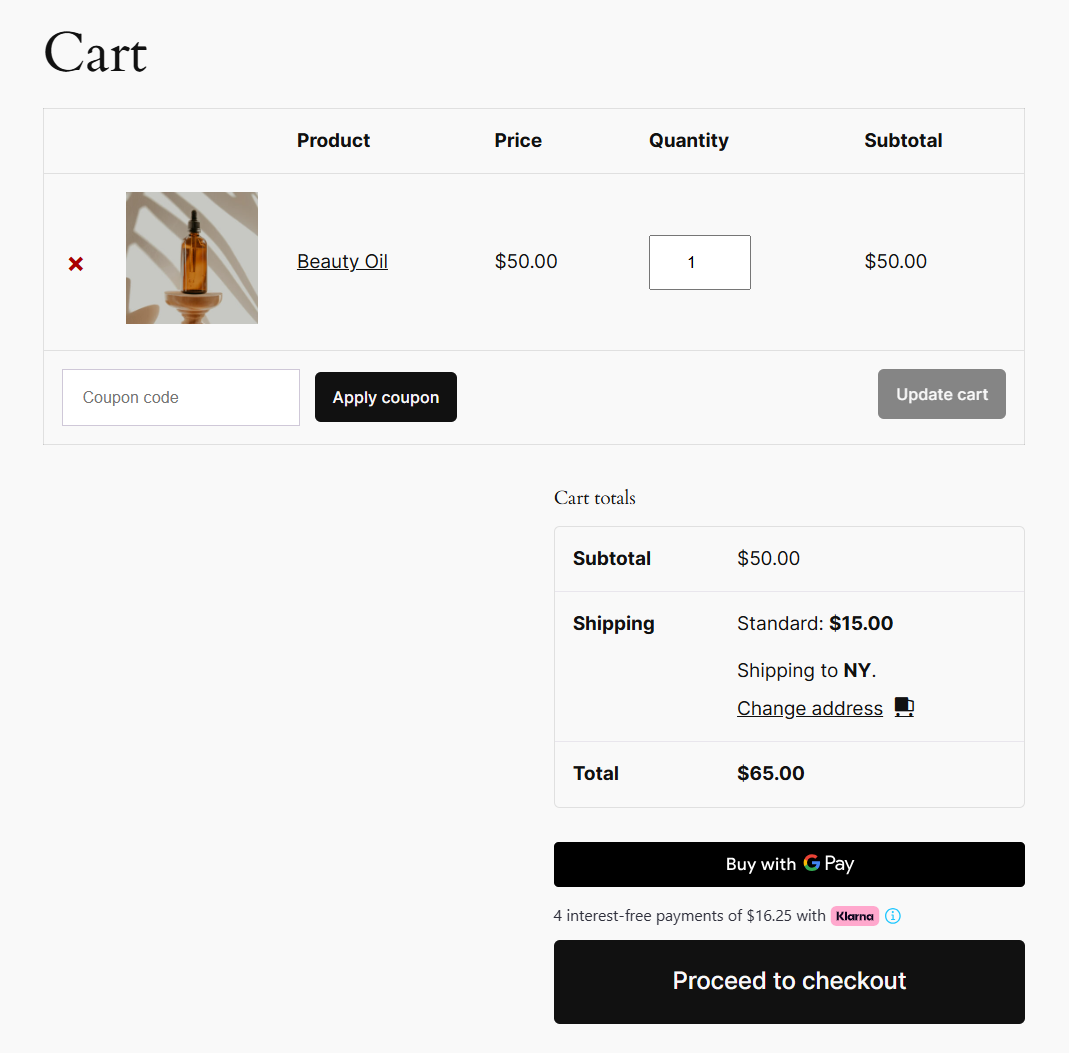
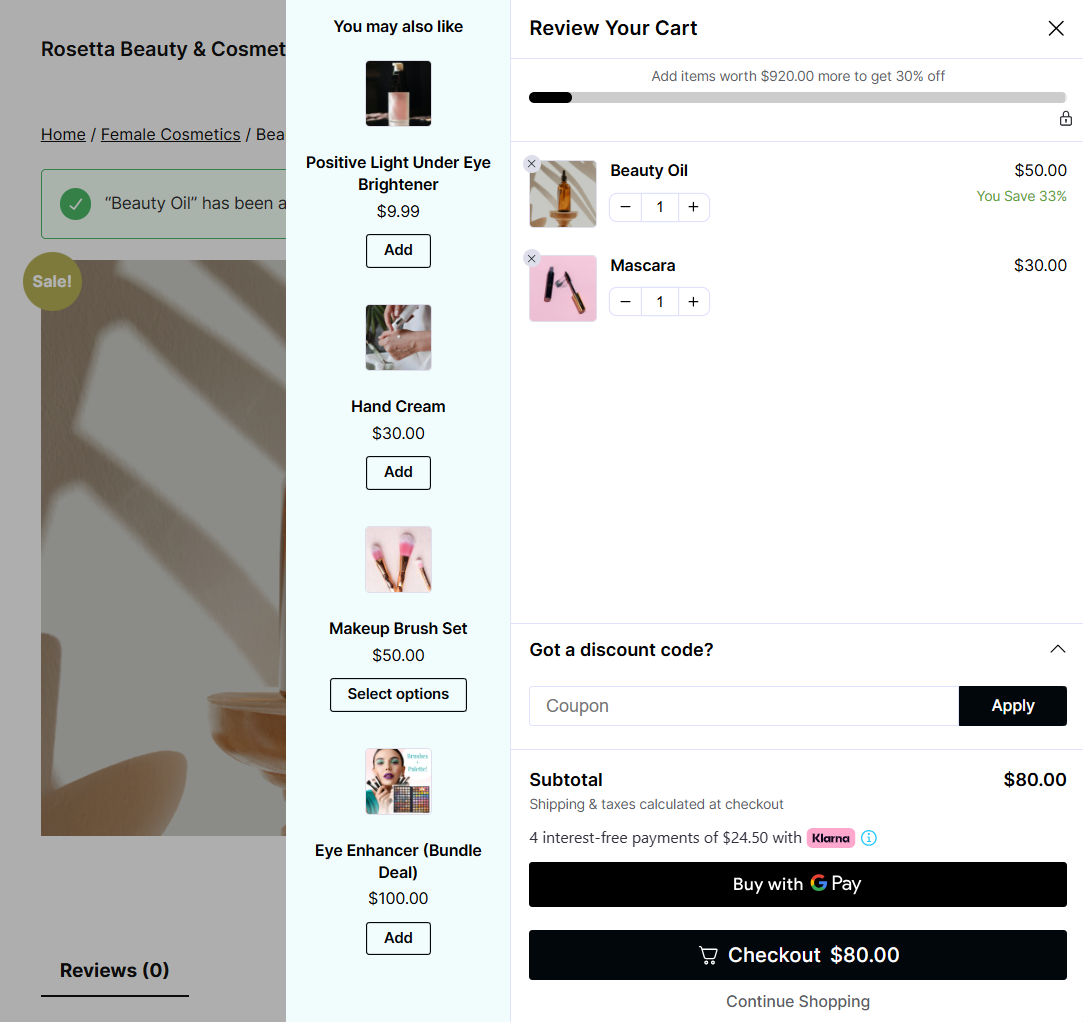
Google Pay express checkout transaction inside the WooCommerce shopping cart
If you use FunnelKit Cart, you can allow shoppers to purchase their cart items from their shopping cart without visiting the checkout page.
FunnelKit Cart replaces the default WooCommerce cart page with a modern, sliding shopping cart.
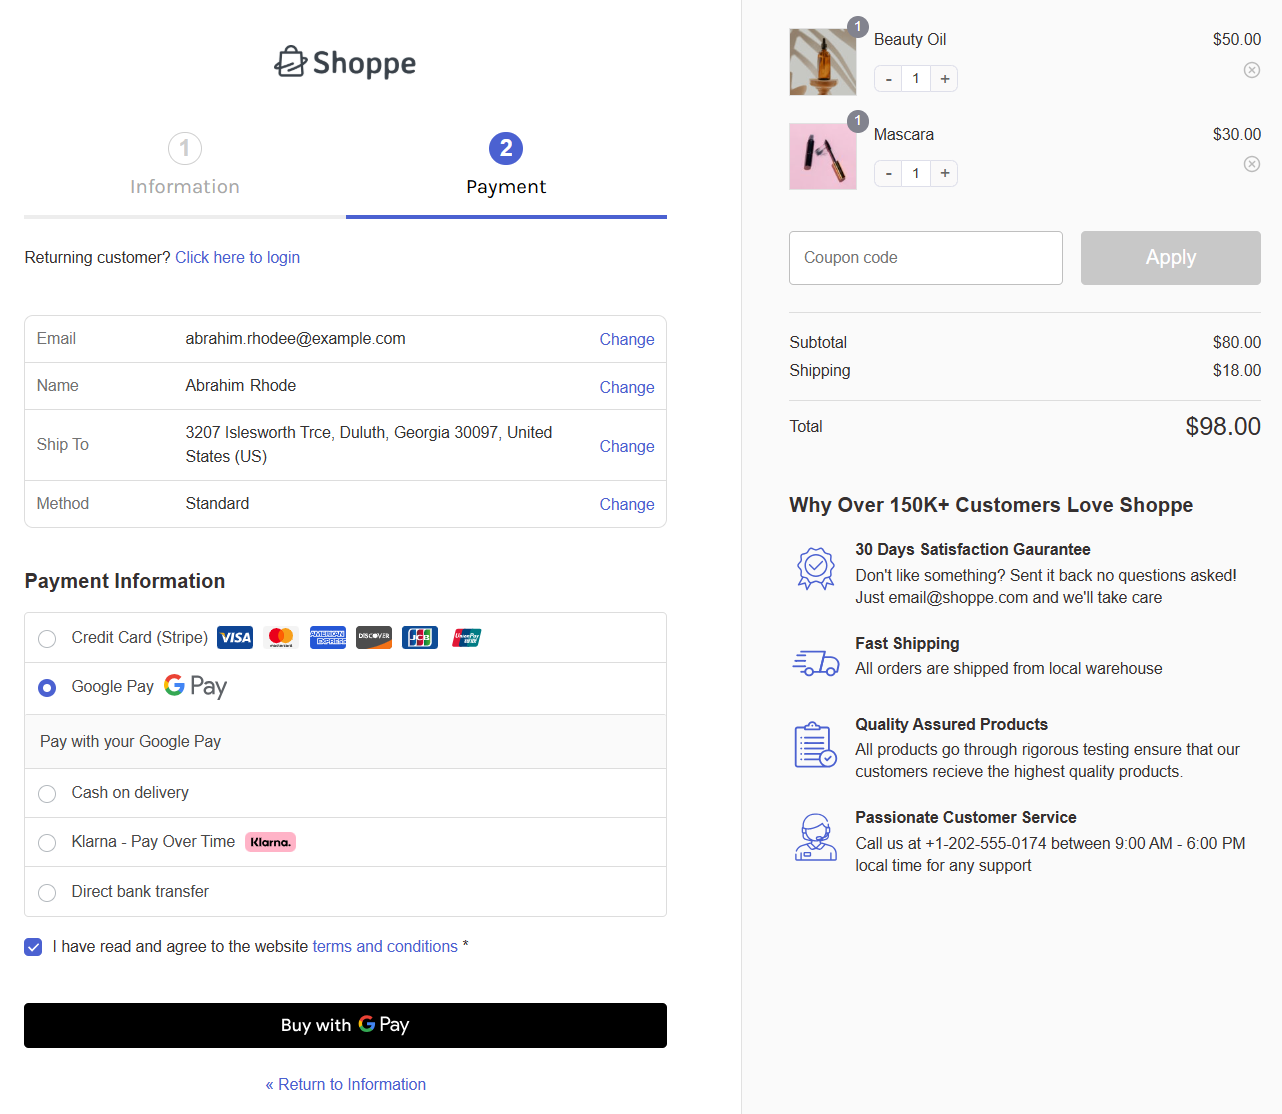
Google Pay express payment on the WooCommerce checkout page
Head to the checkout page and notice the Google Pay button at the top.
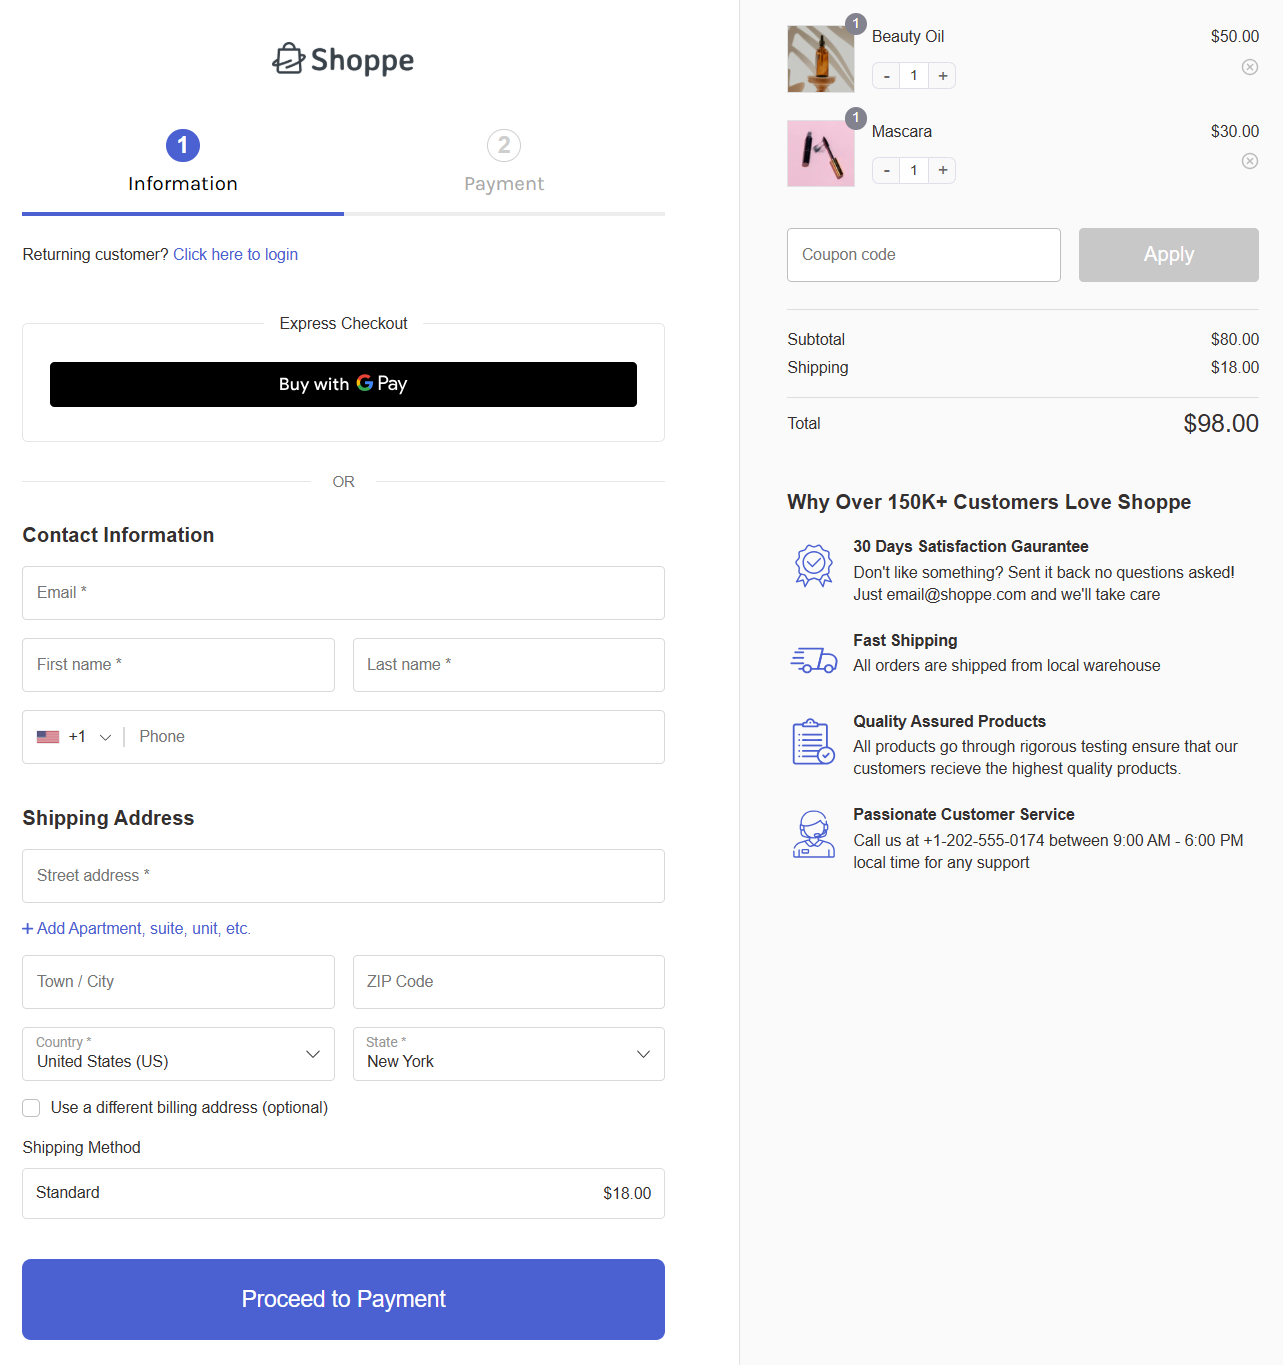
Upon clicking on Buy with GPay, the Google Pay payment authentication window will open up.
Choose your payment card, select your address, and hit the Pay button to place the order.

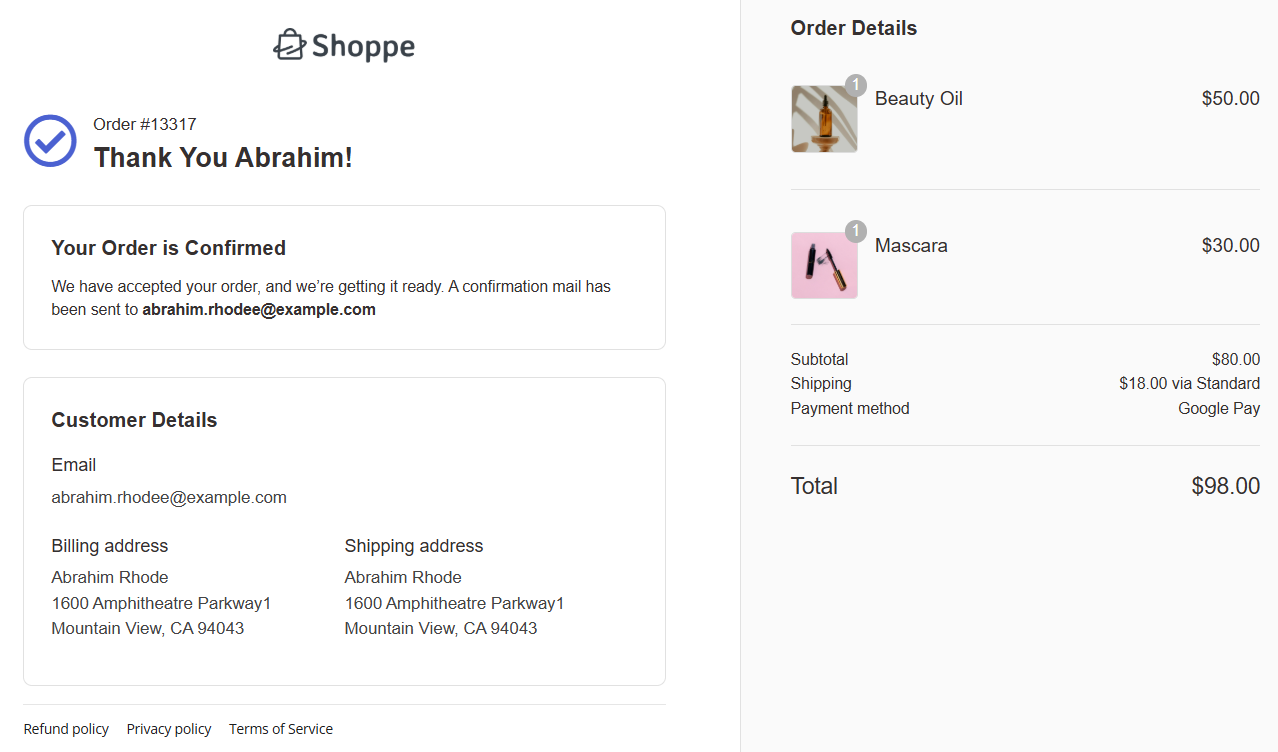
After a successful transaction, you’ll be directed to the thank you page with the payment done with Google Pay.
This is how you can test Google Pay transactions in your WooCommerce store.
How to Set Up Enhanced WooCommerce Google Pay Integration? (Google Merchant ID and Website Integration Submission)
FunnelKit Pay offers you direct Google Pay integration via Google Business Merchant, enabling a smooth and secure checkout experience.
This enhanced integration ensures that both the GPay express checkout and inline payment buttons are available across all browsers and devices, offering shoppers a consistent and frictionless experience.
Follow the steps below to generate a Google merchant ID to conduct live Google Pay transactions in your WooCommerce store.
Step 1: Log in to your Google Business console
Go to Google Business Console and log in to your account.

Step 2: Fill in your WooCommerce business profile
Under the Business Profile section, enter your business information, including the business name, street address, city, state, zip code, and country.

Scroll down and fill in your business’s basic and customer support information.
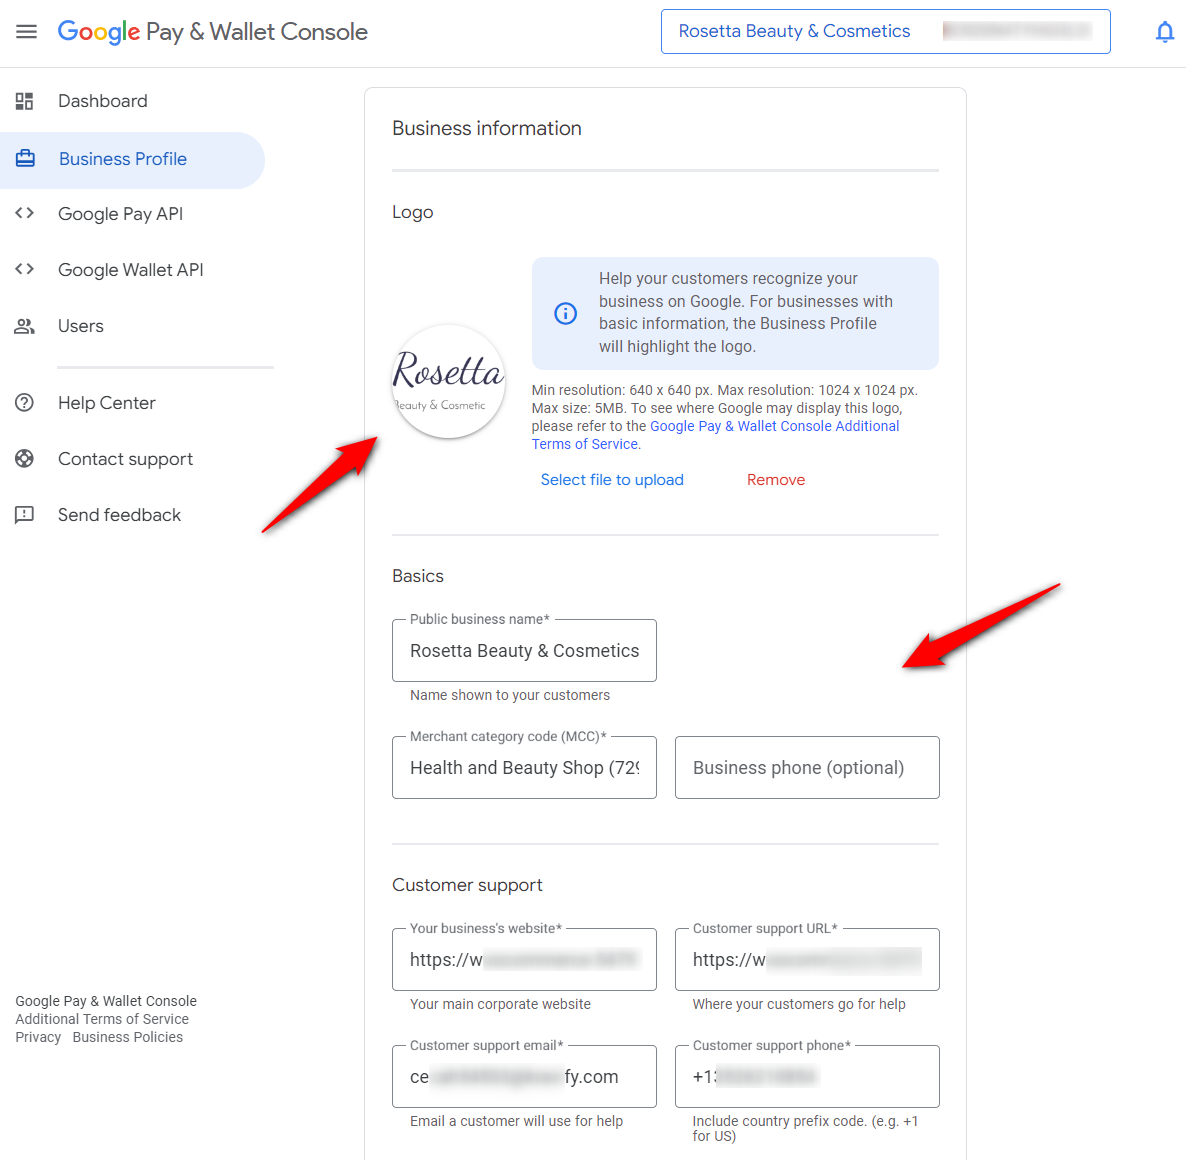
Click on ‘Save’ when done.
After a few minutes, your Google Merchant ID will be generated:

Copy and keep the Merchant ID safe, as you’ll need it in Step 5.
Next, we need to submit our WooCommerce website integration to Google for review and approval.
Step 3: Add your website URL and upload the GPay button screenshots of your store
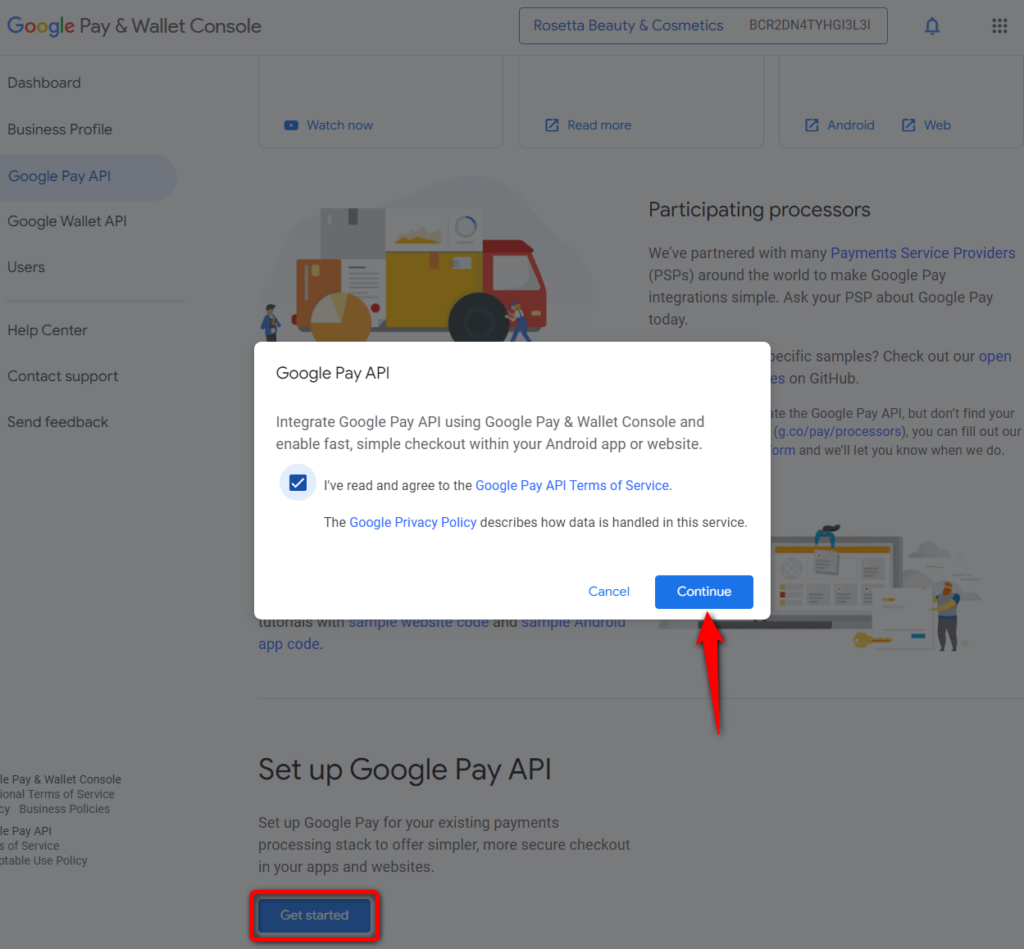
Scroll down and click on ‘Get Started’ under the Set up Google Pay API section.
You’ll see a popup window; click on ‘Continue’.
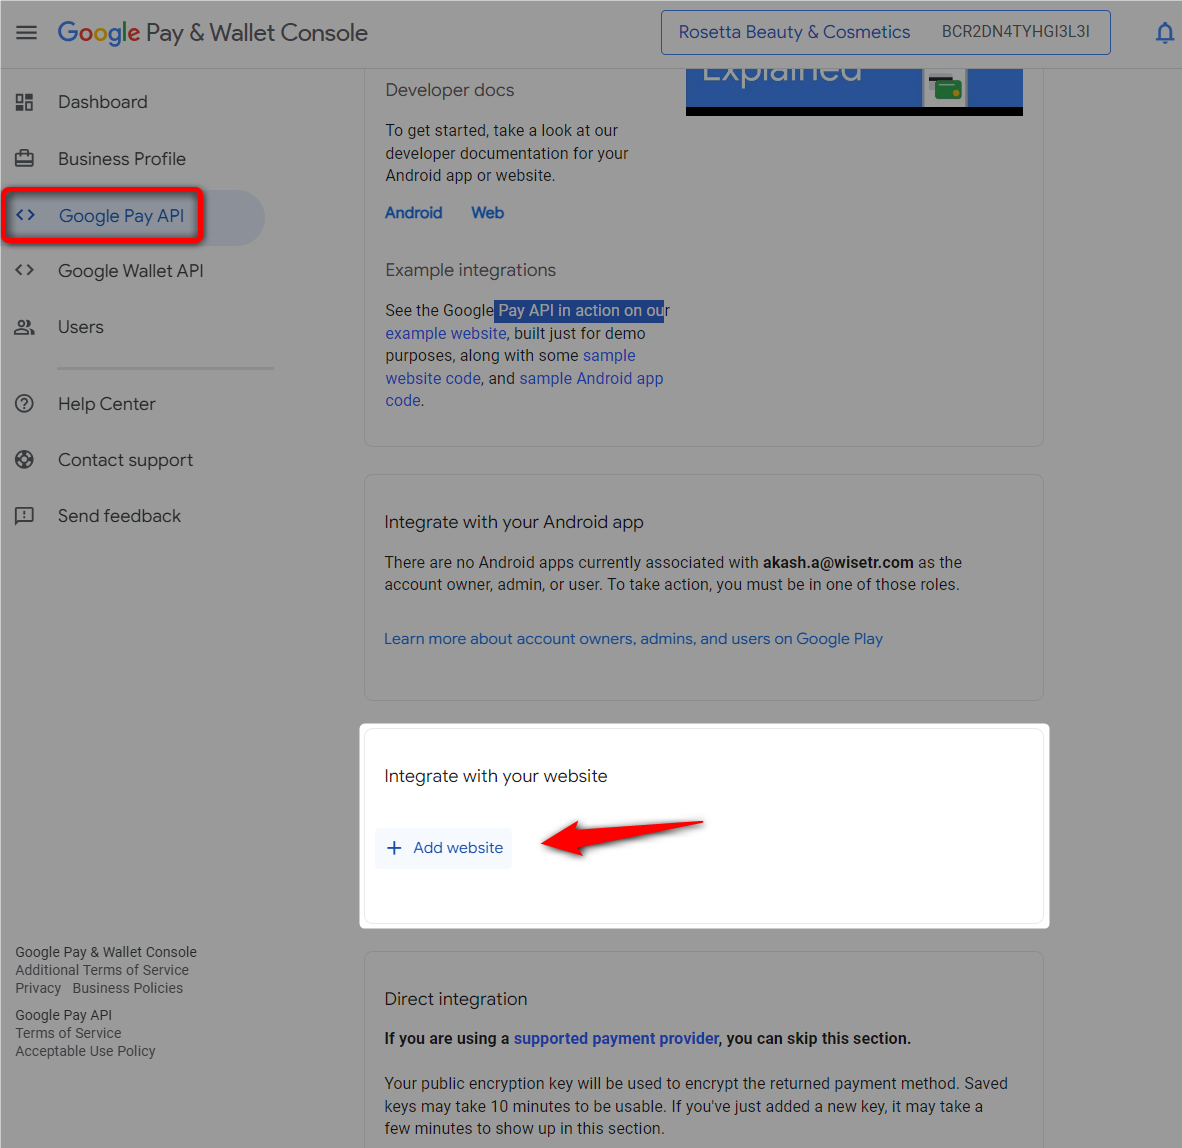
Next, hit ‘+Add Website’ to start the integration process with Google Pay API.
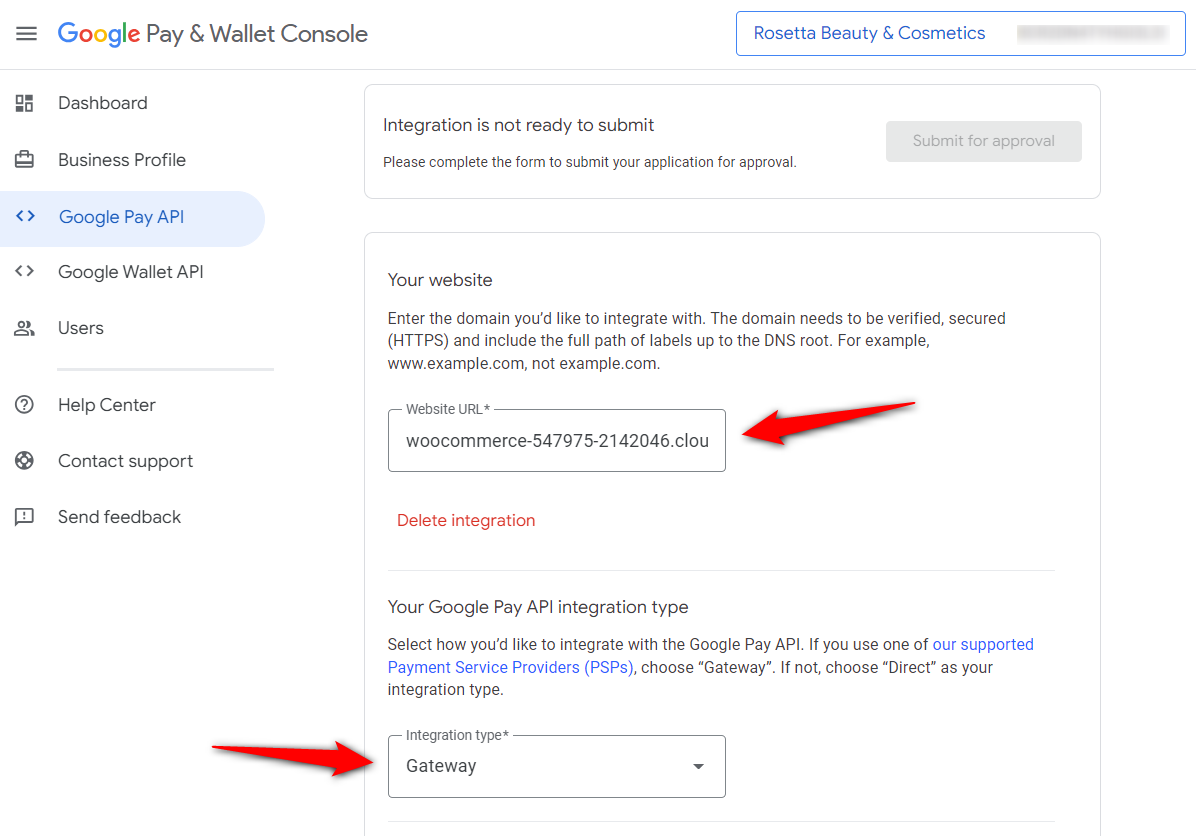
Enter your website URL and select ‘Gateway’ as your Google Pay integration type.
Next, take the following screenshots of the Google Pay button on different pages of your website:
- Product page
- Cart page
- Checkout page
- Google API payment screen
- Thank you page
Upload all of these screenshots on this buyflow screen one at a time as required.
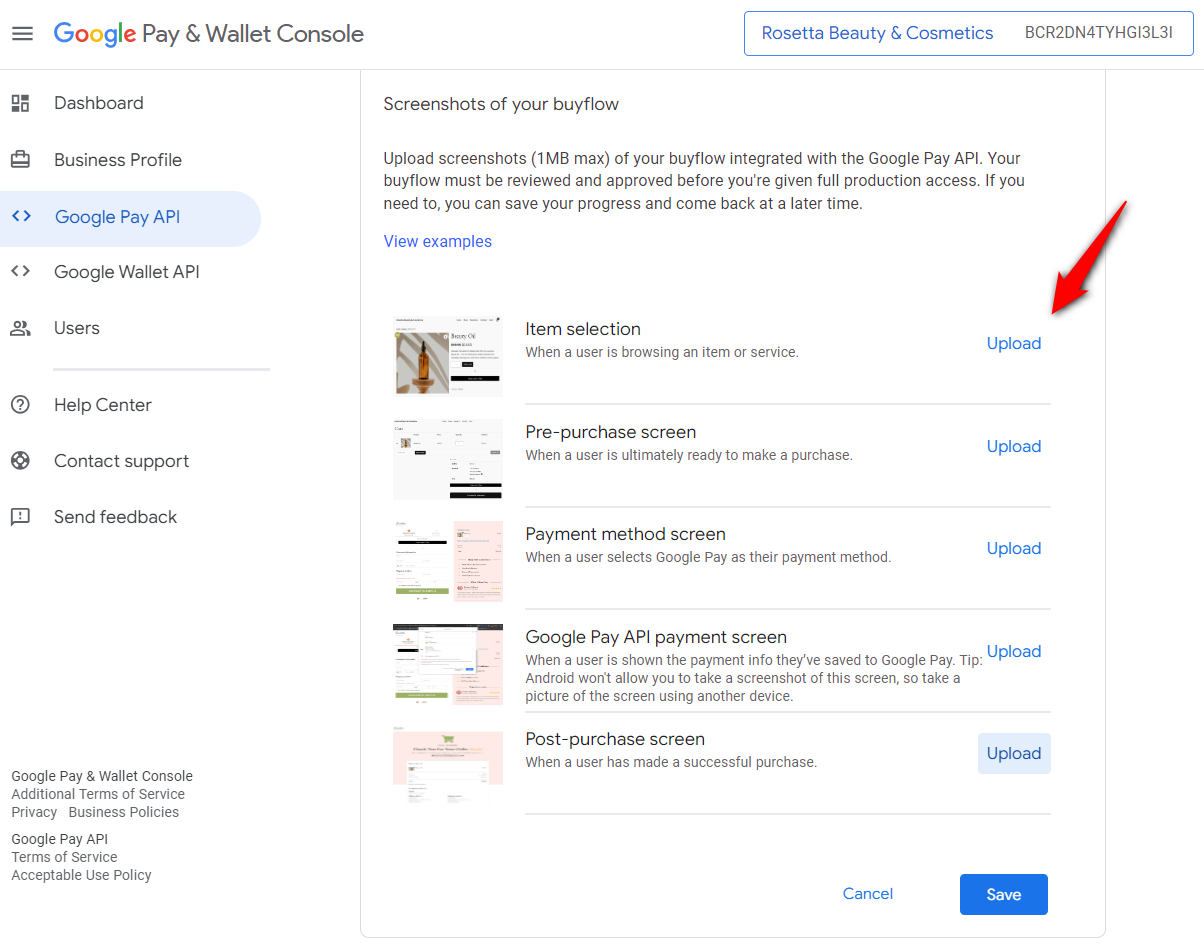
Hit ‘Save’ when done.
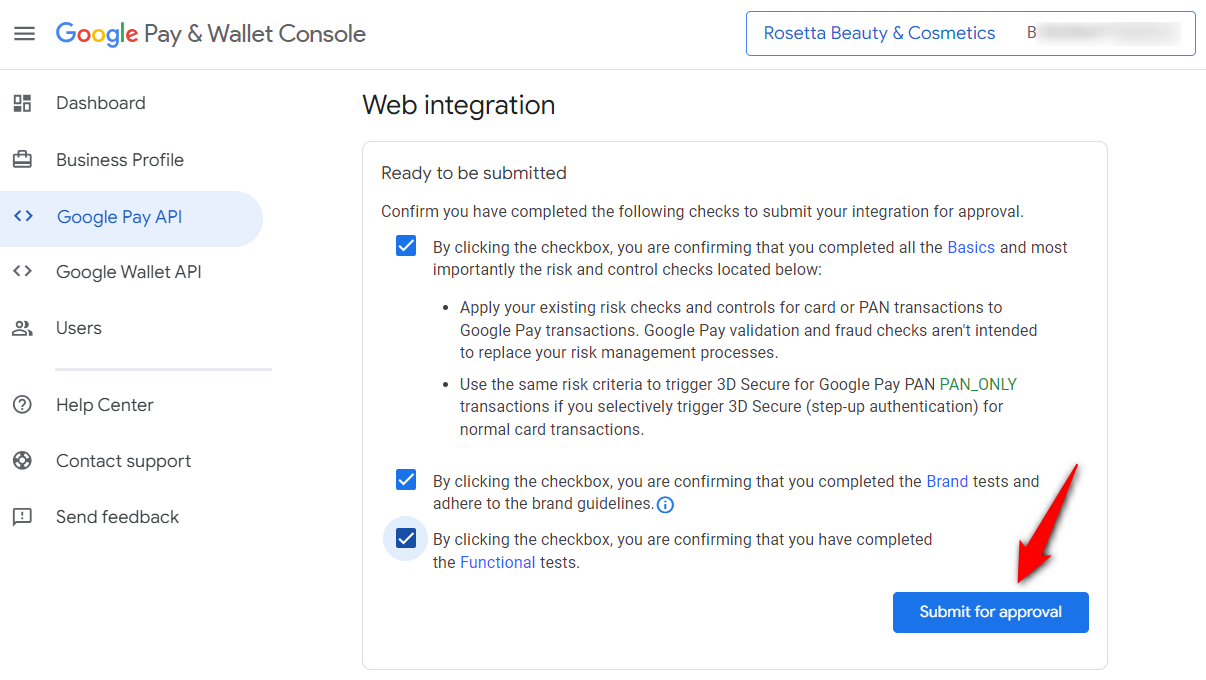
Step 4: Submit your integration for review
Scroll up until you see Web integration.
Check all the boxes and click on the ‘Submit for approval’ button.
The Google API team will review your request. Usually, it takes 2-3 business days for the team to approve your Google Pay integration. However, the timeframe may vary depending on the specific store.
You’ll get a notification once your website is approved and you’ll see it on the same screen:
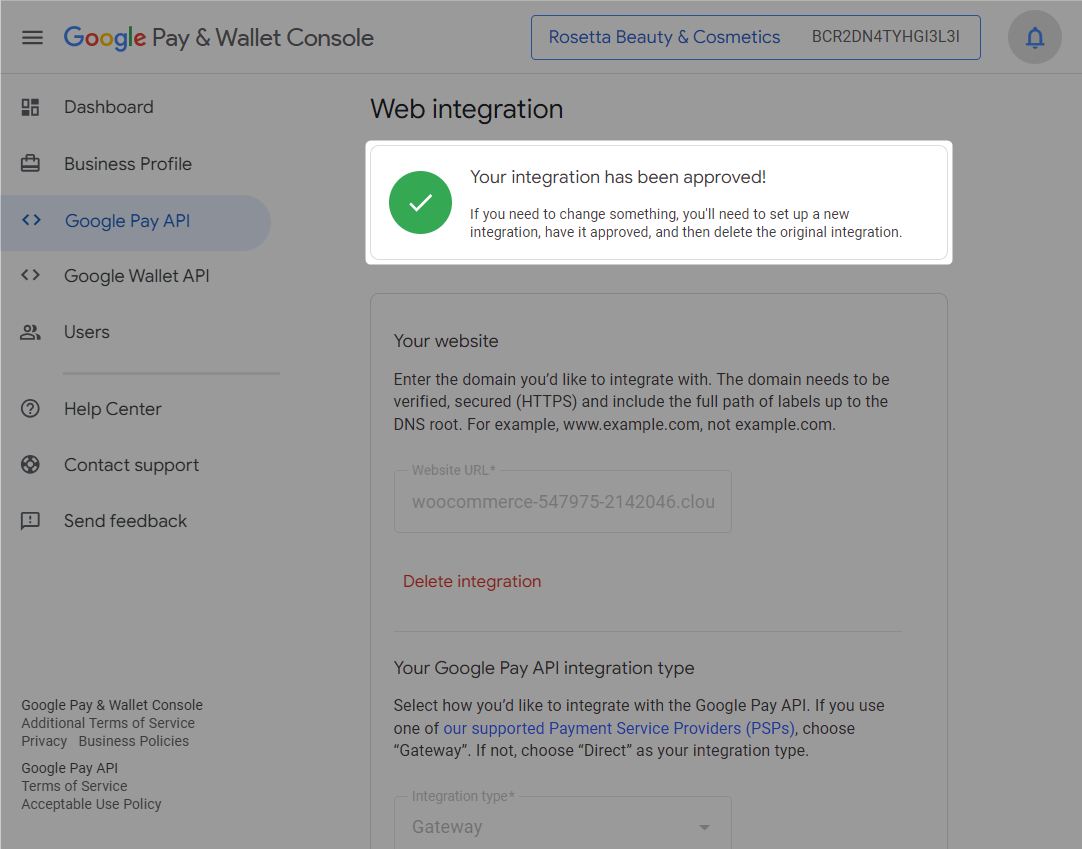
This is how you can request and get approval for Google Pay integration on your WooCommerce website.
Step 5: Copy your Google Merchant ID and paste it into FunnelKit Pay
To conduct live transactions in your store, copy your Merchant ID and paste it into FunnelKit Pay inside the WooCommerce Google Pay settings.
Enable Google Pay inline payment option:
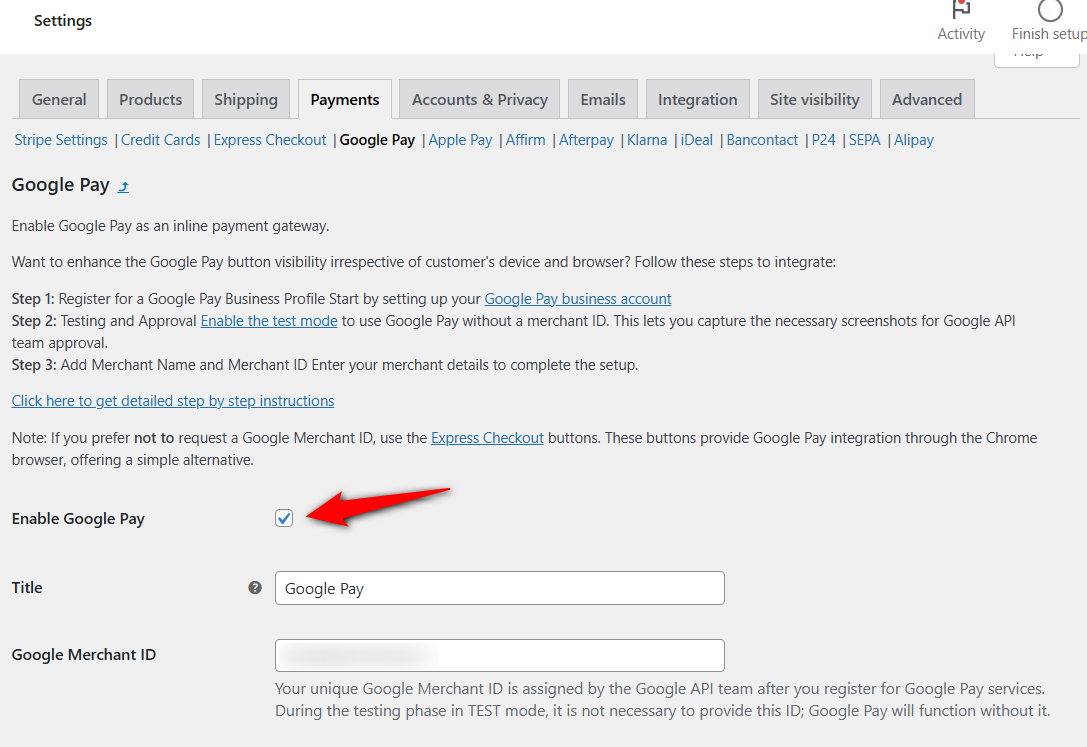
With the inline GPay payment method, you don’t have to worry about shoppers missing out on some important custom fields on your checkout page.
Next, paste your Google Merchant name and ID.
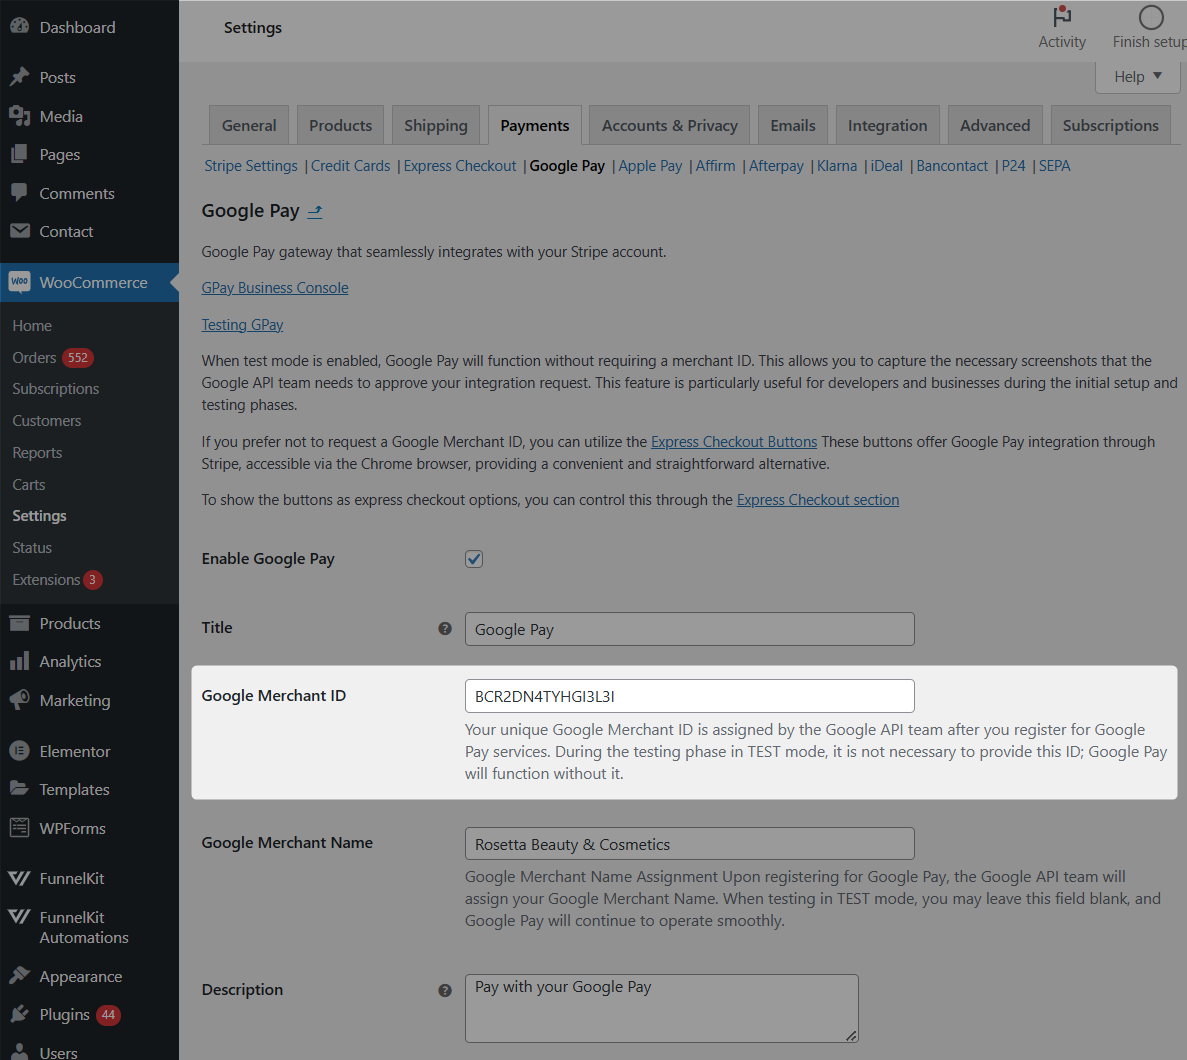
Save the changes when done.
Your Google Pay button will now be visible to your shoppers, and they will be able to carry out real transactions in your store.
Testing Live Google Pay Transactions in Your WooCommerce Store
Do some live transactions with Google Pay to make sure everything is properly set up in your WooCommerce store.
Put your website in “Admin Only Test” or “Live” mode.
Go to the product and see if the Google Pay button is invisible in the incognito window of your web browser.
Add the item to the cart and proceed to checkout to see if the Google Pay button is there (like you did while making test payments).
Pay with a live card to ensure the process is working. This is how you can perform real GPay transactions in your store.
Frequently Asked Questions (FAQs) about WooCommerce Google Pay
In this section, we’ve answered some frequently asked questions from our shoppers:
1. Does WooCommerce support Google Pay?
Yes, WooCommerce supports Google Pay. However, you need to integrate a payment gateway that is compatible with GPay to add it to your WooCommerce store.
2. Which payment gateway is best for WooCommerce?
There are many payment gateways that are compatible with WooCommerce. However, experts recommend Stripe as the best payment gateway.
Stripe supports 135+ currencies and is supported by over 45 countries. It’s PCI DSS Level 1 compliant, ensuring secure payment processing, and handles GDPR, SCA, and PSD2 regulations for global transactions.
It has various compatible payment methods such as credit cards, buy now pay later, Apple Pay, Google Pay, local payments, and many more.
To integrate Stripe with WooCommerce, you need a WooCommerce payment gateway plugin like FunnelKit Pay.
3. How do I add Google Pay to WordPress or How do I integrate Google Pay into my website?
You need FunnelKit Pay to add Google Pay to WordPress and WooCommerce. FunnelKit Pay lets you effortlessly integrate Stripe with your website, which brings in the Google Pay payment method.
FunnelKit Pay lets you set up both GPay express checkout and inline payment options in your store.
We’ve detailed the process set up in this article.
4. Why is Google Pay not showing up in WooCommerce?
If Google Pay is not showing up in WooCommerce, follow the steps below:
Verify eligibility for Google Pay:
- Use a compatible device and an eligible browser like Google Chrome.
- Ensure your WooCommerce store domain is whitelisted for Google Pay – you can find settings in your Stripe dashboard.
- Check the list of countries that support Google Pay.
Note: This method has various limitations because it is dependent on many eligibility conditions. Instead, we recommend setting up the enhanced Google Pay integration with FunnelKit Pay – it lets you add an inline GPay payment gateway and express checkout button, which works on every web browser.
We’ve discussed the enhanced WooCommerce Google Pay integration in this article.
5. Why does Google Pay fail?
A Google Pay transaction can fail due to many reasons:
- Incorrect payment details
- Insufficient funds
- Technical glitches
- Connectivity issues
- Downtime
Make sure to check your payment or card details, ensure you have enough money in your bank account, verify your network connectivity, etc.
6. Is Google Pay API free?
Google Pay doesn’t charge merchants any additional charges. Since your payment processor is Stripe, it charges fees for each transaction, which vary by country.
Ready to Elevate Your WooCommerce Checkout Experience with Google Pay?
Between July 2023 and June 2024, 3 out of 10 United States shoppers used Google Pay for online purchases—a clear testament to its popularity.
Adding express checkout options like Google Pay to your WooCommerce store isn’t just smart; it’s essential for staying competitive.
Best of all, Google Pay doesn’t come with extra costs for merchants. Payment processors handle it like any standard credit card transaction, meaning you’ll only pay the usual processing fees.
By integrating Google Pay, you can deliver a seamless, conversion-boosting checkout experience that your customers will love. Watch your sales soar as you make shopping faster, easier, and more secure.
Don’t wait—start setting up your Google Pay integration today and unlock the true potential of your WooCommerce store!